- By Default, both the parameters have a default value as:-
i) UserVars.ESXiShellTimeOut =0
ii) UserVars.ESXiShellInteractiveTimeOut=0
Value 0 means, it is disable - But if you are in production and had some urgent maintenance or activity enabling SSH & its timeout value could be cumbersome.
- If you have different values as per your environment, you can change the value to 0.
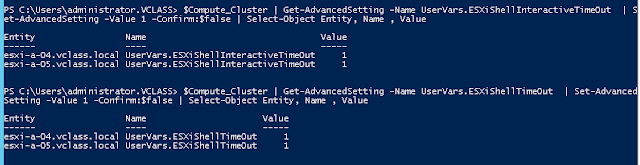
- $Compute_Cluster = Get-Cluster -Name Compute | Get-VMHost
$Compute_Cluster | Get-AdvancedSetting -Name UserVars.ESXiShellTimeOut | Set-AdvancedSetting -Value 0
$Compute_Cluster | Get-AdvancedSetting -Name UserVars.ESXiShellInteractiveTimeOut | Set-AdvancedSetting -Value 0

VirtualSingh
Sunday, 31 December 2017
Uservars.ESXiShellInteractiveTimeOut & Uservars.ESXiShellTimeOut

Thursday, 14 December 2017
Turn ON/OFF SSH on All ESXi host in vCenter/Cluster
$AllEsxi = get-vmhost
$AllEsxi | get-VMhostService | where {$_.key -eq "TSM-SSH"} | Set-VMHostService -Policy ON
$Allesxi| Get-VMHostService | where {$_.key -eq "TSM-SSH"} | Start-VMHostService
Output:-

- First, we declare a variable $AllEsxi which stores result from Get-VMhost & then we are enabling SSH on all the given hosts.
- If you want to turn OFF the SSH on all the hosts, simply replace ON with OFF and run the command.
- To turn off & stop the service on all the host.
$AllEsxi | Get-VMhostService | where {$_.key -eq "TSM-SSH"} | Set-VMHostService -Policy OFF
$Allesxi| Get-VMHostService | where {$_.key -eq "TSM-SSH"} | Stop-VMHostService
$Allesxi| Get-VMHostService | where {$_.key -eq "TSM-SSH"} | Stop-VMHostService
- If you want to do it at Cluster level, then specify the cluster variable or then use the following:-
$Cluster_Host = Get-Cluster MyCluster | Get-VMHost
$Cluster_Host | get-VMhostService | where {$_.key -eq "TSM-SSH"} | Set-VMHostService -Policy ON
$Cluster_Host | Get-VMHostService | where {$_.key -eq "TSM-SSH"} | Start-VMHostService
- If you want to turn ON/OFF service at cluster level, then specify the cluster variable or use the following:-
$Cluster_Host | Get-VMhostService | where {$_.key -eq "TSM-SSH"} | Set-VMHostService -Policy OFF
$Cluster_Host | Get-VMHostService | where {$_.key -eq "TSM-SSH"} | Stop-VMHostService
$Cluster_Host | Get-VMHostService | where {$_.key -eq "TSM-SSH"} | Stop-VMHostService
Thursday, 16 November 2017
Login in vCloud Director using REST API Client - POSTMAN
- Nowadays most of the virtualization products support REST-API.
- I first learned to interact using rest-api is with RavelloSystems(a cloud platform by Oracle)
- The best client I have come across for it is POSTMAN client available for windows, mac & Linux. I have installed it on my MacBook & windows 10 machine.
- So this time I wanted to interact with vCloud Director 8.2 & 9.0 using REST-API
- After a long day meeting and looking for how to log in successfully in vCD using postman client, somehow I figured it late night
- So the basic options that we use in it are GET, PUT, POST & DELETE.
- So if you have worked on HTML it makes it easy to understand the output.
- As VMware has already started in vCenter 6.5 - REST API explorer.
Steps to login in vCD using POSTMAN
- URL for vCD i.ehttps://IP or FQDN/api/sessions
- Authentication- Basic (As per snapshot no. 1)
Username- administrator@system :- If you are a system administrator.
I found it difficult for the username which took me this much time. So this user can be a LDAP integrated user or Active Directory.
Password- As per your directory - Once authorized with Status:200 OK . In the AUTHORIZATION tab as highlighted, we have HEADERS tab where we will recieve a x-vcloud-authorization: token.
- Instead of using your credentials for authentication, we can use the custom header (As per snapshot no. 2 & 3).
- Now we are ready to work on this REST-API for interaction using postman client.


Sunday, 29 October 2017
Virtual Machine - Edit Settings - (Disk) Part 3(i)
So after writing the series for CPU & Memory. This series will be dedicated to Settings related to vmdk i.e Virtual Machine Disk.

- The first option is the size of the virtual machine which can be in MB, GB or TB.
- Maximum Size is the size of the datastore up to which VM hard disk could expand.
VM Storage Policies in production environments is created for storage tiering if using traditional storage i.e Block-Level Storage, Virtual San or a Virtual Volume.
VM Storage policies can be created & managed from vSphere Web Client. I"ll be writing a series of post for different policies which can be created for Virtual SAN, Virtual Volume & Block level storage.
Sunday, 15 October 2017
vSAN Policies with PowerCLI(FTT=1,Stripe=3, Object Space Reservation = 50%)
New-SpbmStoragePolicy -Name OBS -AnyOfRuleSets (New-SpbmRuleSet (New-SpbmRule -Capability (Get-SpbmCapability -Name "VSAN.hostfailuresToTolerate") -Value 1), (New-SpbmRule -Capability (Get-SpbmCapability -Name "VSAN.stripeWidth") -Value 3),(New-SpbmRule -Capability (Get-SpbmCapability -Name VSAN.proportionalCapacity)-Value 50))
Output:-

vSAN Policies with PowerCLI(FTT=1, RAID5/6)
New-SpbmStoragePolicy -Name PowerCLI-RAID5 ` -AnyOfRuleSets ` (New-SpbmRuleSet ` (New-SpbmRule -Capability (Get-SpbmCapability -Name "VSAN.hostFailuresToTolerate" ) -Value 1),(New-SpbmRule -Capability (Get-SpbmCapability -Name "VSAN.replicaPreference" ) -Value "RAID-5/6 (Erasure Coding) - Capacity"))
Output:-

vSAN Policies with PowerCLI(Striping=3)
New-SpbmStoragePolicy -Name Stripe=3 -RuleSet(New-SpbmRuleSet -Name "striping=3" -AllOfRules @((NewSpbmRule -Capability VSAN.stripewidth 3)))
Output:-

vSAN Policies with PowerCLI (No redundancy i.e FTT=0)
New-SpbmStoragePolicy -Name FTT=0 -RuleSet(New-SpbmRuleSet -Name "NoRedundancy" -AllOfRules @((New-SpbmRule -Capability VSAN.hostFailuresToTolerate 0)))
Output:-


Add Target for software iscsi using esxcli
esxcli iscsi adapter discovery sendtarget add -a iscsi.vclass.local:3260 -A vmhba33
Output:-

Output:-
Enable software iscsi on esxi02
Get-VMHostStorage -VMHost esxi02.vclass.local | Set-VMHostStorage –SoftwareIscsiEnabled $True
Output:-

Create a Port Group for vMotion(TCP/IP Stack enabled for vMotion)
New-VMHostNetworkAdapter -VMHost esxi02.vclass.local -PortGroup vMotion -VirtualSwitch vSwitch2 -IP 172.20.12.52 -SubnetMask 255.255.255.0 -VMotionEnabled $true
Output:-

Output:-

Join a host to active directory domain
Get-VMHostAuthentication -VMHost esxi01.vclass.local | Set-VMHostAuthentication -JoinDomain vclass.local -Username administrator -Password VMware1!
Output:-

Output:-

Thursday, 17 August 2017
Virtual Machine - CPU (Reservations, Shares & Limits) Part 1(viii)
As I said, we"ll be covering the CPU - Reservation, Shares & Limits.
The SI Unit for CPU is hertz(Hz), frequency or clock cycles per second that were somewhat limited to the first generation CPUs. Now in the 21st Century, CPU's have larger processing capability with more clock cycles per second thereby measured in MHz(MegaHertz) i.e one million cycles per second & GHz(GigaHertz) i.e one billion cycles per second.
RESERVATION: Guaranteed minimum allocation of Resources.
LIMIT: Upper bound of given resource or the maximum amount of resource CONSUMER is entitled from physical(ESXi).
SHARES: Priority of a VM's access to a given resource.
In Case of CPU, Share values can be defined as Low, Normal, High & Custom.
In the 2 VMs named, CPU1(Girish01-2), CPU2(Girish01-3). I am running a script to increase the CPU activity.
In other 3 VMs named VM01(Low), VM02(Normal) & VM03(High) running normally with different share values.

People are use to ask is there a performance impact on the VMs!! Nah!. There will be NO IMPACT till the time every one is not hungry for resource as soon as every one is hungry for the resource, there you go!!
As given in the screenshot with the help of CPU shares, the VM01 with high is getting more priority and henceforth.

Reference:Click here.
Thursday, 10 August 2017
Installing PowerCLI Version 10
Check the version of PowerShell in windows System,
In order to install powercli 6.5.2 , the version of PowerShell should be 5 or above.
To install PowerShell 5 for windows server 2012, click here.
Download it, install and update the windows server.
Once done run this command to check the PowerShell version

In order to install powercli 6.5.2 , the version of PowerShell should be 5 or above.
To install PowerShell 5 for windows server 2012, click here.
Download it, install and update the windows server.
Once done run this command to check the PowerShell version
- $psversiontable


Once PowerShell version is updated, run these commands
- Find-module -Name VMware.PowerCLI
- Install-Module -Name VMware.PowerCLI -Scope CurrentUser

Once finished, you will be able to run powercli commands from the same window.
Tuesday, 8 August 2017
Virtual Machine - Edit Settings (Memory) Part 2 (i)
In my previous Series of posts, we have explored options available under CPU(Part1 to Part7).
In this series, we are going to talk about Memory options as below:-

Using this option, Memory Hot Plug: Memory can only be increased, it can not be decreased.
Given below is the screenshot of Windows Server 2012, Standard Edition that supports increasing the memory on the fly.
Before: After:

In this series, we are going to talk about Memory options as below:-

As said for CPU & Memory Reservations, Shares & Limits, I"ll be running a separate post after completing all the options related to virtual machine edit settings.
Here, In this post, the option to explore is Memory Hot Plug.
It can not be enabled when the machine is in running state and as told in case of CPU Hot Add posts earlier, it has to be supported by the operating system as in these given KB2020993 & KB2051989 articles.
Given below is the screenshot of Windows Server 2012, Standard Edition that supports increasing the memory on the fly.
Before: After:

Friday, 4 August 2017
Virtual Machine - Edit Settings (CPU) Part 1 (vii)
In my previous post, I have talked about scheduling affinity.
In this post Part 7, I am going to talk about CPU/MMU Virtualization.


In this post Part 7, I am going to talk about CPU/MMU Virtualization.

In this screenshot as you can see, I have used vSphere Web Client, Right Click on virtual machine & edit settings.
11. CPU/MMU Virtualization:- By default, it is automatic. Here, we get three options in this drop-down i.e
i) Software CPU & MMU
ii) Hardware CPU, Software MMU
iii) Hardware CPU & MMU
Software CPU - Software Based CPU Virtualization
Hardware CPU - Hardware assisted CPU Virtualization
Hardware MMU(Memory Management Unit) & Software MMU (Memory Management Unit)
For better understanding refer to this article.
Wednesday, 2 August 2017
Virtual Machine - Edit Settings (CPU) Part 1 (iv)
In my previous post, we have talked about Performance Counter.
In this post CPU Part 6, We are going to talk about Scheduling Affinity
In this post CPU Part 6, We are going to talk about Scheduling Affinity
In this screenshot as you can see, I have used vSphere Web Client, Right Click on virtual machine & edit settings.
10. Scheduling Affinity:- By default, a virtual CPU is scheduled to run on a logical CPU. Using this feature one can restrict a VM to a dedicated LCPU.
EX:- Lets say we have ESXi with 8LCPU numbered from 0 to 7.
If we are using Scheduling affinity then it can be specified as 1,2,3,4-6 either way means you can specify dedicated LCPU number or the range of LCPU that can be used.
USE CASE:- For CPU Intensive VM performance testing purpose to check whethere scheduling it to dedicated LCPU enhances its performance or to check VMs throughput and response time when pinning it down to LCPU.
Tuesday, 1 August 2017
Virtual Machine - Edit Settings (CPU) Part 1 (v)
In my previous post, we have talked about CPUID Mask.
In this post of CPU Part 5, We are going to talk about Performance Counter
In this post of CPU Part 5, We are going to talk about Performance Counter
In this screenshot as you can see, I have used vSphere Web Client, Right Click on virtual machine & edit settings.
9. Enable Virtualized CPU performance counters: It is mainly used by developers for debugging software(software profilers) which is going to run in a VM such as vTune, OProfile, CodeAnalyst.
This feature is going to make some additional CPU related performance counters (MSRs-Model Specific Registers) available to the guest OS.
There is a KB2030221, which is related to what CPU Performance counters are exposed to guest OS.
Monday, 31 July 2017
Virtual Machine - Edit Settings (CPU) Part 4(iv)
In my previous post, we have talked about Enable CPU Hot Add.
I am going to skip Reservations, Limit & Shares which will be covered along with calculations in a later post.
In this screenshot as you can see, I have used vSphere Web Client, Right Click on virtual machine & edit settings.
7.CPUID Mask: By default, VM is set to expose the NX/XD flag to guest.
This feature helps prevent execution of certain type of code.
Ex: Here, I have Windows 7 32-bit installed in which I have Enabled/Disabled this feature.

Default, Expose NX/XD flag to guest.
Later on, I Hide the NX/XD flag from guest (64-bit Windows Server 2012) I get this error.

I tried it on Windows7-32 bit, it has a feature DEP (Data Execution Prevention)

Sunday, 30 July 2017
Virtual Machine - Edit Settings (CPU) Part 3 (iii)
In my previous post, I have talked about CORE.
Now in this Part 3, We are going to talk about ENABLE CPU Hot Add.

In this screenshot as you can see, I have used vSphere Web Client, Right Click on virtual machine & edit settings.
3.ENABLE CPU Hot Add: This feature lets you add or remove CPU resource to a powered ON virtual machine.
It should be supported by the operating system and should be turned on in advance i.e If VM is running then this option is grayed out. In order to turn it, VM should be in POWERED OFF state.


It should be supported by the operating system and should be turned on in advance i.e If VM is running then this option is grayed out. In order to turn it, VM should be in POWERED OFF state.

This information is from Windows Server 2012 R2 Standard Edition.
Once CPU Hot Add is enabled:

This information is from Windows Server 2012 R2 Standard Edition.
Now if you want to decrease the number of CPU, that can only be done if VM is powered OFF.
We are able to edit get this CPU option, I have installed Windows Server 2012 R2 Standard Edition. VMware has published these KB articles related to CPU Hot Add Feature: KB2020993, KB2051989 which relates to this feature for various operating systems.
Saturday, 29 July 2017
Virtual Machine - Edit Settings (CPU) Part 1 (ii)
In my previous post, I have talked about CPU.
Now in this Part 2, We are going to talk about CORE.
In this screenshot as you can see, I have used vSphere Web Client, Right Click on virtual machine & edit settings.
CPU Settings:-
2.CORE: Here I have shared an example of single socket , quad core processor.
Initially when VMware released CORES PER SOCKET, it was there to deal with software licensing issue. So as to reduce number of licenses , which were based on SOCKETS. Further, for performance it is beyond the scope of this blog post which includes: NUMA, vNUMA CPU technologies.

An interesting example is given on this KB:2078069
Virtual Machine - Edit Settings (CPU) Part 1 (i)
In order to learn more, one has to explore more.
In this series of blog post, i"ll be talking about all the options one have for a virtual machine.
This is Part 1 of virtual machines & I"ll be explaining and giving real time examples for all these options which are available for a virtual machine. In the end, we want our virtual machines to be running healthy. Hell Yeah!!

In this screenshot as you can see, I have used vSphere Web Client, Right Click on virtual machine & edit settings.
CPU Settings:-
1.CPU: It depends on your physical processor(Socket & Cores Per Socket) that are present on your server.
As you can see in my case, what my host(ESXi) has, I can that as LCPU to my VM.
If there is no hyperthreading than the total number of LCPU =8 & if it is enabled then the total number of LCPU=16. VCPU(Virtual CPU for VM) is scheduled on LCPU(Logical CPU, part of core).

So, In my case, the maximum number of vCPU that can be assigned to the VM =16.
Wednesday, 26 April 2017
Amazon AWS & Microsoft Azure Part 1. - Virtual Machines
I was very keen to learn about these two CLOUD giants namely Amazon's AWS & Microsoft's Azure. So I started to explore about them that how are they similar and different from their offering perspective.
Both of them are Public Cloud offerings as most of the people are aware of it. So let's just start.
Azure has near to 68 offerings that one can choose from their big list whereas AWS has near to 100 offerings. Further, you can check their offerings on other blog posts. Like TOM's IT ProT has a very good comparison of it.
Starting with their Virtual Machine Related Services:-
Step1. Need to setup an account for AWS & Azure .
AWS has various type of Instances available, in layman's terms size of virtual machines. I"ll be using a Free Tier instance which will be T2.Micro


Azure has different size of Virtual Machine available.


Both of them are Public Cloud offerings as most of the people are aware of it. So let's just start.
Azure has near to 68 offerings that one can choose from their big list whereas AWS has near to 100 offerings. Further, you can check their offerings on other blog posts. Like TOM's IT ProT has a very good comparison of it.
Starting with their Virtual Machine Related Services:-
AWS - EC2 ( Elastic Compute) & Azure Virtual Machines (Compute)
Here you can choose from a wide variety of Virtual machine instances that you can deploy and start using. So will start how to create a VM in EC2 and end with AWS Virtual machine.Step1. Need to setup an account for AWS & Azure .
AWS has various type of Instances available, in layman's terms size of virtual machines. I"ll be using a Free Tier instance which will be T2.Micro


Similar way how to create a EC2 instance, you can check on Amazon tutorials as well.
Azure has different size of Virtual Machine available.


Subscribe to:
Posts (Atom)